How to set up a website with Google Analytics using Google Tag Manager
Setting up a new site with Google Analytics is something I do quite regularly. And since the sites I develop for my agency typically have multiple people that want add additional tags (or “pixels”) to the sites, everything goes through Google Tag Manager.
If you’ve never done anything with Tag Manager before, this post will walk you through the most common usage scenario—setting up Analytics.
Since this is a new blog, I’m going to set up Analytics and Tag Manager for this very site. ;)
1. Create a Tag Manager account
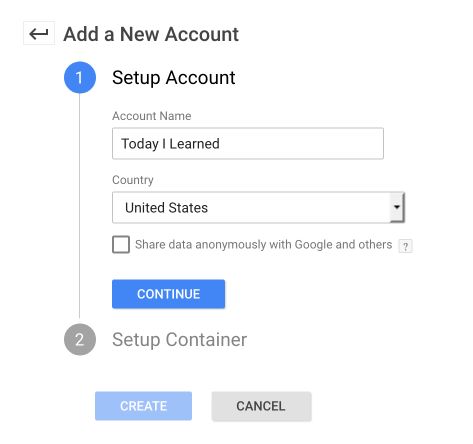
Go to tagmanager.google.com. Log in with your Google account and follow the simple steps to create a new Tag Manager account. You’ll actually be setting up two different things here:
- An “account”
- A “container”
These two things sound similar, but the Container if where your tags are actually setup. An Account is an umbrella for one or more Containers. Typically, you’ll want one unique container for each unique website.
If you already have an account, then you can skip the first item and just create another container inside that account. Otherwise, when you create a new account, it’ll also step you through creating the first container for that account.


2. Add Google Tag Manager to your website
Once you’ve created your GTM account and container, it will give you two separate code snippets to copy/paste into your website.
- One goes as high in the
<head>of the HTML as possible (right after the opening<head>tag is fine). This is a JavaScript implementation that is used for 99% of visitors. - One goes as high in the
<body>of the HTML as possible (again, I recommend putting it right after the opening<body>tag). This one is a “noscript” implementation (an<iframe>) for any browser with JavaScript disabled. You need both of these tags to cover all your bases.
Of course, I’d recommend a DRY approach and saving the GTM code as a global site variable and using that in the code snippet.
I work a lot with Jekyll websites, so I would create a site.gtm_code variable in my _config.yml file like so:
gtm_code: GTM-ABC1234
And here are the two snippets (Jekyll-ized) that I’m including in my template.
Head snippet
<!-- Google Tag Manager -->
<script>(function(w,d,s,l,i){w[l]=w[l]||[];w[l].push({'gtm.start':
new Date().getTime(),event:'gtm.js'});var f=d.getElementsByTagName(s)[0],
j=d.createElement(s),dl=l!='dataLayer'?'&l='+l:'';j.async=true;j.src=
'https://www.googletagmanager.com/gtm.js?id='+i+dl;f.parentNode.insertBefore(j,f);
})(window,document,'script','dataLayer','{{site.gtm_code}}');</script>
<!-- End Google Tag Manager -->
Body snippet
<!-- Google Tag Manager (noscript) -->
<noscript><iframe src="https://www.googletagmanager.com/ns.html?id={{site.gtm_code}}"
height="0" width="0" style="display:none;visibility:hidden"></iframe></noscript>
<!-- End Google Tag Manager (noscript) -->
3. Create a Google Analytics account
Go to analytics.google.com, sign in with your Google account, and create a new Google Analytics account. What we’re after here is a UA code (eg. UA-1234567).
Your account setup may look something like this:

Now, copy the UA code presented to you.
4. Go back to Tag Manager
Head back to GTM now, armed with your new UA code, and open up the container you created previously.
Click on Variables and then proceed to create a new User-Defined Variable. This is where you’ll place the UA code to connect it to the Analytics tag you’ll add in a moment.
- Give the variable a name such as Google Analytics Variable
- The Variable Type should be Google Analytics Settings
- Then paste your UA code in the Tracking ID field
There are some custom/advanced options here, but most people won’t need them. The default setup covers most use cases.

Now we’ll create a Tag and Trigger to round things out.
A Tag is a piece of code that will get added to the site, and the Trigger is how we define when/how often a given piece of code should be added.
In your container, create a new Tag and name it whatever you like (eg. Google Analytics Tag).
- The Tag type should be Google Analytics - Universal Analytics. (There are a bunch of ready-made tags here to make your life easier, but you can also make your own HTML snippet if you want.)
- Track Type should be Page View. We can also set up Events and such, but we’ll start with the basics.
- Under Google Analytics Setting, choose the name of the Variable you just created.
- Under Triggers, choose the All Pages preset trigger all ready for you.
Your tag may look like this:

Click “Save” and… we’re almost done.
5. Publish your changes
Nothing done in Tag Manager goes live until you publish your changes.
In the top right, click Submit. Add a brief title and description of your changes here (eg. “Added Google Analytics Tag and Variable”). You should see your new Tag and Variable in the list of submitted changes.
Click Publish and wait for it to finish.
6. Check Analytics
Now, let’s go back to Analytics and make sure it’s working. First visit your website, then head to the Real-Time Analytics dashboard. If everything was done properly, you should see yourself appear.

There we are!!
Recap
In short order, here’s the steps we took
- Created a Tag Manager container
- Added the Tag Manager code snippets to our website (head and body)
- Created an Analytics account
- Created a Variable in Tag Manager with our UA code
- Created a Tag for Google Analytics set to trigger a Page View on All Pages
- Published our changes